As Salesforce pushes out updates for the Salesforce for Outlook extension, users will individually need to run the update to get to the latest version.
I hope the following steps will make it easier for you to complete the update yourself!
Follow these 6 steps to complete the update:
- Close: Outlook
- Close: Salesforce for Outlook app
If it is still running , this is probably hidden in your System Tray / Notification Area.
*The icon will be grey or red.
*With both Outlook and the Salesforce for Outlook app closed, you can now run the update.
- Salesforce | [Your Name] | My Settings: Go to My Settings to find and download the latest version for Salesforce for Outlook.
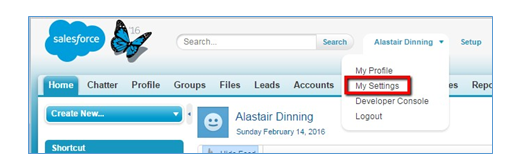
- Desktop Add-Ons:
On the My Settings landing page, you should see the Desktop Add-Ons on the home page.
You can also type “Outlook” into the Quick Find box on the left.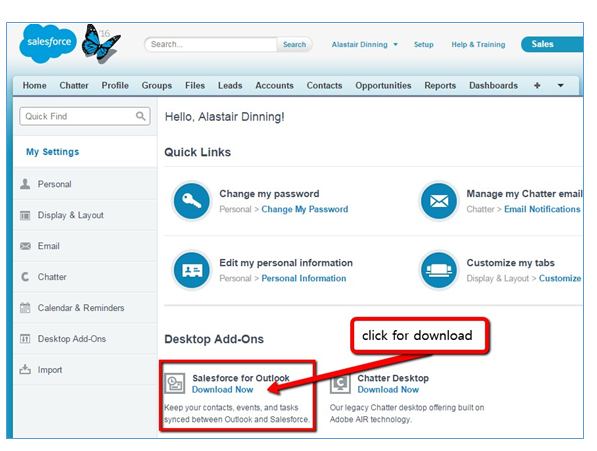
- Salesforce for Outlook: Click Download Now
- Once download is complete:
Double-check that Outlook and the Salesforce for Outlook app are closed, then run the installer.
Trouble-shooting Tips:
- If you continue to have issues, please contact your Help Desk or Salesforce Administrator.
- If the upgrade didn’t run, try rebooting the computer, check and ensure the Salesforce for Outlook app is closed, and run the installer.
- These instructions assume the logged-in user has local admin rights on their PC. If not, please contact your IT Help Department.
- It may be necessary to purge the local database file.
If you continue to have issues, please contact your Help Desk or Salesforce Administrator.
Contact us today.